Hadoop Installation Guide (Env. Hadoop 2.6.0 and CentOs7)
Step 1: Installing Java
Java is the primary requirement for running hadoop on any system, So make sure you have Java installed on your system using following command.
#java -version java version "1.8.0_31 " Java(TM) SE Runtime Environment (build 1.8.0_31-b13) Java HotSpot(TM) 64-Bit Server VM (build 25.31-b07, mixed mode)
If you don’t have Java installed on your system, use one of following link to install it first.
Install Java 8 on CentOS/RHEL 7/6/5
After a long wait, finally Java SE Development Kit 8 is available to download. JDK 8 has been released on Mar,18 2014 for general availability with the many featured enhancements. You can find all the enhancements in JDK 8 here.

This article will help you to Install JAVA 8 (JDK 8u31) or update on your system. Read instruction carefully for downloading java from Linux command line. To Install Java 8 in Ubuntu and LinuxMint read This Article.
Downloading Latest Java Archive
Download latest Java SE Development Kit 8 release from its official download page or use following commands to download from shell.
For 64Bit
# cd /opt/
# wget --no-cookies --no-check-certificate --header "Cookie: gpw_e24=http%3A%2F%2Fwww.oracle.com%2F; oraclelicense=accept-securebackup-cookie" "https://download.oracle.com/otn-pub/java/jdk/8u31-b13/jdk-8u31-linux-x64.tar.gz"

# tar xzf jdk-8u31-linux-x64.tar.gz
For 32Bit
# cd /opt/
# wget --no-cookies --no-check-certificate --header "Cookie: gpw_e24=http%3A%2F%2Fwww.oracle.com%2F; oraclelicense=accept-securebackup-cookie" "https://download.oracle.com/otn-pub/java/jdk/8u31-b13/jdk-8u31-linux-i586.tar.gz"

# tar xzf jdk-8u31-linux-i586.tar.gz
Install Java with Alternatives
After extracting archive file use alternatives command to install it. alternatives command is available in chkconfig package.
# cd /opt/jdk1.8.0_31/ # alternatives --install /usr/bin/java java /opt/jdk1.8.0_31/bin/java 2 # alternatives --config java There are 3 programs which provide 'java'. Selection Command ----------------------------------------------- * 1 /opt/jdk1.8.0/bin/java + 2 /opt/jdk1.8.0_25/bin/java3 /opt/jdk1.8.0_31/bin/java Enter to keep the current selection[+], or type selection number:3
At this point JAVA 8 has been successfully installed on your system. We also recommend to setup javac and jar commands path using alternatives
# alternatives --install/usr/bin/jar jar /opt/jdk1.8.0_31/bin/jar 2 # alternatives --install/usr/bin/javac javac /opt/jdk1.8.0_31/bin/javac 2 # alternatives --setjar /opt/jdk1.8.0_31/bin/jar # alternatives --setjavac /opt/jdk1.8.0_31/bin/javac
Check Installed Java Version
Check the installed version of java using following command.
#java -version java version "1.8.0_31 " Java(TM) SE Runtime Environment (build 1.8.0_31-b13) Java HotSpot(TM) 64-Bit Server VM (build 25.31-b07, mixed mode)
Configuring Environment Variables
Most of java based application’s uses environment variables to work. Set the Java environment variables using following commands
Setup JAVA_HOME Variable
# export JAVA_HOME=/opt/jdk1.8.0_31
Setup JRE_HOME Variable
# export JRE_HOME=/opt/jdk1.8.0_31/jre
Setup PATH Variable
# export PATH=$PATH:/opt/jdk1.8.0_31/bin:/opt/jdk1.8.0_31/jre/bin
Step 2: Creating Hadoop User
We recommend to create a normal (nor root) account for hadoop working. So create a system account using following command.
# useradd hadoop
# passwd hadoop
After creating account, it also required to set up key based ssh to its own account. To do this use execute following commands.
# su - hadoop
$ ssh-keygen -t rsa
$ cat ~/.ssh/id_rsa.pub >> ~/.ssh/authorized_keys
$ chmod 0600 ~/.ssh/authorized_keys
Lets verify key based login. Below command should not ask for password but first time it will prompt for adding RSA to the list of known hosts.
$ ssh localhost (If there is error about the port 22. try: $/sbin/service sshd start)
$ exit
Step 3. Downloading Hadoop 2.6.0
Now download hadoop 2.6.0 source archive file using below command. You can also select alternate download mirror for increasing download speed.
$ cd ~
$ wget https://apache.claz.org/hadoop/common/hadoop-2.6.0/hadoop-2.6.0.tar.gz
$ tar xzf hadoop-2.6.0.tar.gz
$ mv hadoop-2.6.0 hadoop
Step 4. Configure Hadoop Pseudo-Distributed Mode
4.1. Setup Environment Variables
First we need to set environment variable uses by hadoop. Edit ~/.bashrc file and append following values at end of file.
export HADOOP_HOME=/home/hadoop/hadoop
export HADOOP_INSTALL=$HADOOP_HOME
export HADOOP_MAPRED_HOME=$HADOOP_HOME
export HADOOP_COMMON_HOME=$HADOOP_HOME
export HADOOP_HDFS_HOME=$HADOOP_HOME
export YARN_HOME=$HADOOP_HOME
export HADOOP_COMMON_LIB_NATIVE_DIR=$HADOOP_HOME/lib/native
export PATH=$PATH:$HADOOP_HOME/sbin:$HADOOP_HOME/bin
Now apply the changes in current running environment
$source ~/.bashrc
Now edit $HADOOP_HOME/etc/hadoop/hadoop-env.sh file and set JAVA_HOME environment variable
export JAVA_HOME=/opt/jdk1.8.0_31/
4.2. Edit Configuration Files
Hadoop has many of configuration files, which need to configure as per requirements of your hadoop infrastructure. Lets start with the configuration with basic hadoop single node cluster setup. first navigate to below location
$ cd $HADOOP_HOME/etc/hadoop
Edit core-site.xml
<configuration>
<property>
  <name>fs.default.name</name>
    <value>hdfs://localhost:9000</value>
</property>
</configuration>
Edit hdfs-site.xml
<configuration>
<property>
<name>dfs.replication</name>
<value>1</value>
</property>

<property>
  <name>dfs.name.dir</name>
    <value>file:///home/hadoop/hadoopdata/hdfs/namenode</value>
</property>

<property>
  <name>dfs.data.dir</name>
    <value>file:///home/hadoop/hadoopdata/hdfs/datanode</value>
</property>
</configuration>
Edit mapred-site.xml
<configuration>
<property>
  <name>mapreduce.framework.name</name>
   <value>yarn</value>
</property>
</configuration>
Edit yarn-site.xml
<configuration>
<property>
  <name>yarn.nodemanager.aux-services</name>
    <value>mapreduce_shuffle</value>
</property>
</configuration>
4.3. Format Namenode
Now format the namenode using following command, make sure that Storage directory is
$hdfs namenode -format
Sample output:
15/02/04 09:58:43 INFO namenode.NameNode: STARTUP_MSG:
/************************************************************
STARTUP_MSG: Starting NameNode
STARTUP_MSG:   host = svr1.tecadmin.net/192.168.1.133
STARTUP_MSG:   args = [-format]
STARTUP_MSG:   version = 2.6.0
...
...
15/02/04 09:58:57 INFO common.Storage: Storage directory /home/hadoop/hadoopdata/hdfs/namenode has been successfully formatted.
15/02/04 09:58:57 INFO namenode.NNStorageRetentionManager: Going to retain 1 images with txid >= 0
15/02/04 09:58:57 INFO util.ExitUtil: Exiting with status 0
15/02/04 09:58:57 INFO namenode.NameNode: SHUTDOWN_MSG:
/************************************************************
SHUTDOWN_MSG: Shutting down NameNode at svr1.tecadmin.net/192.168.1.133
************************************************************/
Step 5. Start Hadoop Cluster
Lets start your hadoop cluster using the scripts provides by hadoop. Just navigate to your hadoop sbin directory and execute scripts one by one.
YOU CAN START THE NODES AND STOP NODES EASYLY. FOLLOWING COMMANDS.
$ start-all.sh
$ stop-all.sh
Following instruction is how to run nodes seperately....
$ cd $HADOOP_HOME/sbin/
Now run start-dfs.sh script.
$start-dfs.sh
Sample output:
15/02/04 10:00:34 WARN util.NativeCodeLoader: Unable to load native-hadoop library for your platform... using builtin-java classes where applicable
Starting namenodes on [localhost]
localhost: starting namenode, logging to /home/hadoop/hadoop/logs/hadoop-hadoop-namenode-svr1.tecadmin.net.out
localhost: starting datanode, logging to /home/hadoop/hadoop/logs/hadoop-hadoop-datanode-svr1.tecadmin.net.out
Starting secondary namenodes [0.0.0.0]
The authenticity of host '0.0.0.0 (0.0.0.0)' can't be established.
RSA key fingerprint is 3c:c4:f6:f1:72:d9:84:f9:71:73:4a:0d:55:2c:f9:43.
Are you sure you want to continue connecting (yes/no)? yes
0.0.0.0: Warning: Permanently added '0.0.0.0' (RSA) to the list of known hosts.
0.0.0.0: starting secondarynamenode, logging to /home/hadoop/hadoop/logs/hadoop-hadoop-secondarynamenode-svr1.tecadmin.net.out
15/02/04 10:01:15 WARN util.NativeCodeLoader: Unable to load native-hadoop library for your platform... using builtin-java classes where applicable
Now run start-yarn.sh script.
$start-yarn.sh
Sample output:
starting yarn daemons
starting resourcemanager, logging to /home/hadoop/hadoop/logs/yarn-hadoop-resourcemanager-svr1.tecadmin.net.out
localhost: starting nodemanager, logging to /home/hadoop/hadoop/logs/yarn-hadoop-nodemanager-svr1.tecadmin.net.out
Step 6. Access Hadoop Services in Browser
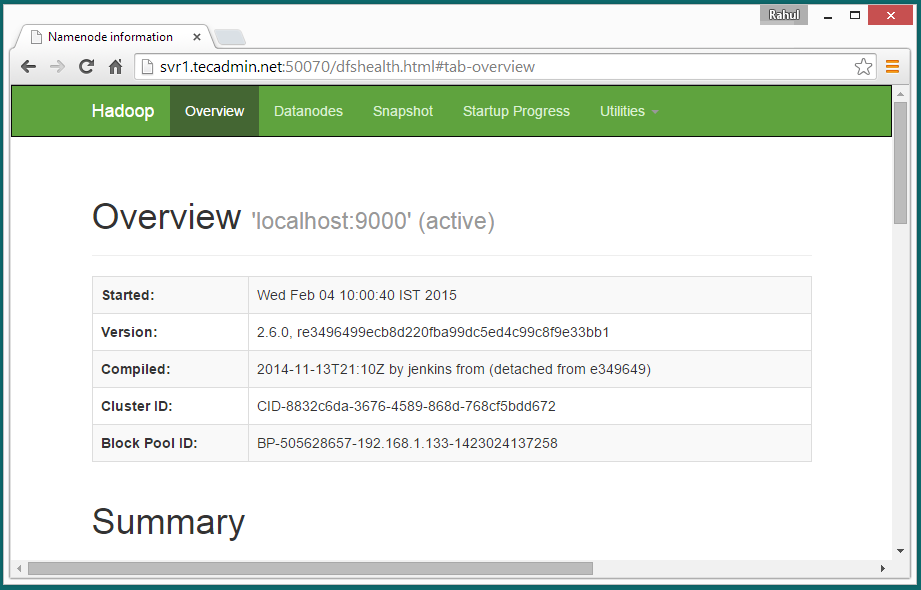
Hadoop NameNode started on port 50070 default. Access your server on port 50070 in your favorite web browser.
https://localhost:50070/
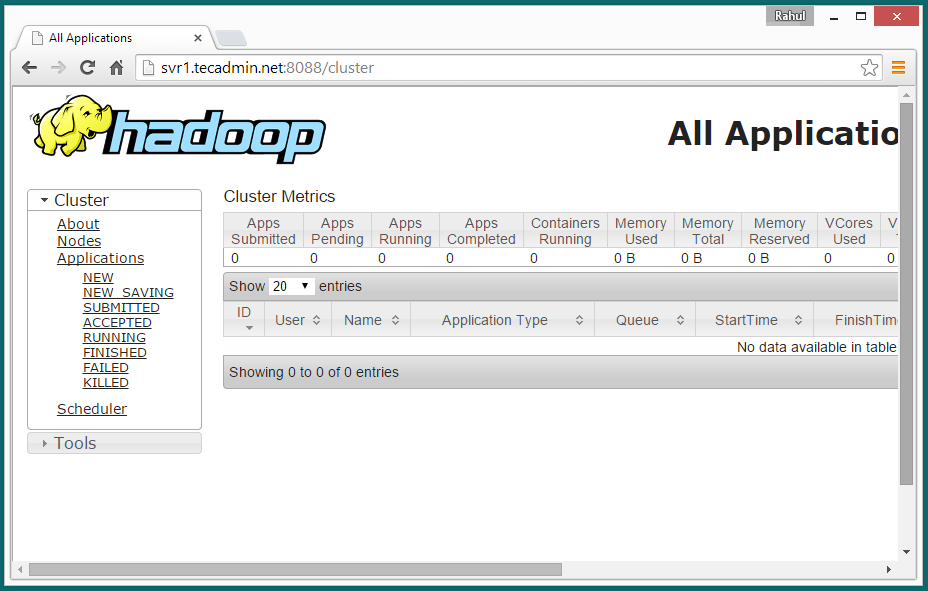
Now access port 8088 for getting the information about cluster and all applications
https://localhost:8088/
Access port 50090 for getting details about secondary namenode.
https://localhost:50090/

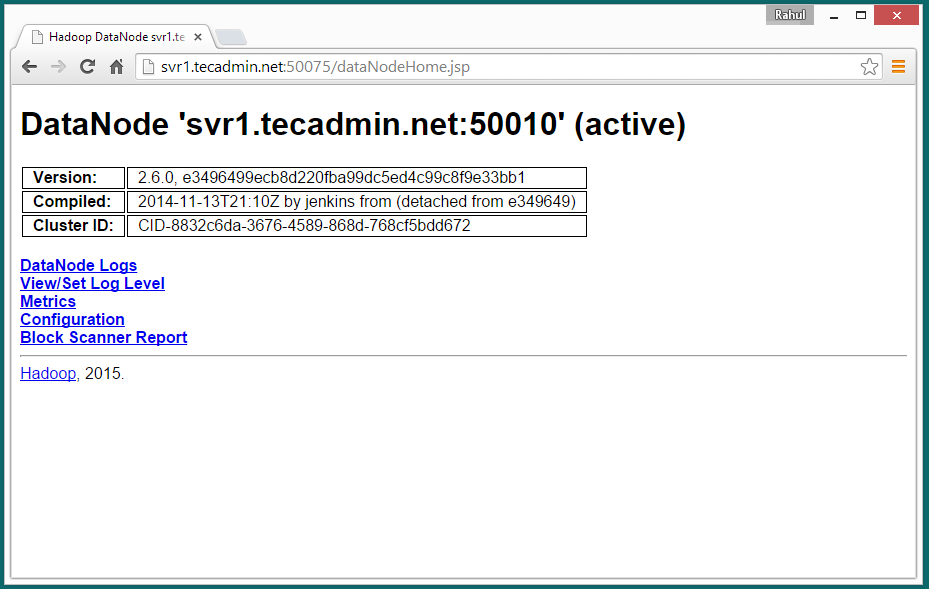
Access port 50075 to get details about DataNode
https://localhost:50075/
Step 7. Test Hadoop Single Node Setup
7.1 - Make the HDFS directories required using following commands.
$ bin/hdfs dfs -mkdir /user
$ bin/hdfs dfs -mkdir /user/hadoop
7.2 - Now copy all files from local file system /var/log/httpd to hadoop distributed file system using below command
$ bin/hdfs dfs -put /var/log/httpd logs
7.3 - Now browse hadoop distributed file system by opening below url in browser.
https://localhost:50070/explorer.html#/user/hadoop/logs

7.4 - Now copy logs directory for hadoop distributed file system to local file system.
$ bin/hdfs dfs -get logs /tmp/logs
$ ls -l /tmp/logs/